

How to Setup Amazon Sagemaker Studio using AWS CDK
AWS Community Builder, AWS ML Specialist, Full-Stack Developer
Amazon SageMaker Studio is the first fully integrated development environment (IDE) for machine learning (ML). Studio provides a single web-based visual interface where you can perform all ML development steps required to prepare data, as well as build, train, and deploy models. You can quickly upload data, create new notebooks, train and tune models, move back and forth between steps to adjust experiments, compare results, and deploy models to production all in one place, making you much more productive.
In this article, we see how to use the AWS Cloud Development Kit (AWS CDK) to use the new native resource in AWS CloudFormation to set up Studio and configure its access for data scientists and developers in your organization. This way you can set up Studio quickly and consistently, enabling you to apply DevOps best practices and meet safety, compliance, and configuration standards across all AWS accounts and Regions. We use Python as the main language, but the code can be easily changed to other AWS CDK supported languages.
The AWS CDK is an open-source software development framework to model and provision your cloud application resources using familiar programming languages.
Prerequisites
To get started, make sure you have the following prerequisites:
- The AWS Command Line Interface (AWS CLI) installed
- The AWS CDK installed
- An AWS profile with permissions to create AWS Identity and Access Management (AWS IAM) roles, Studio domains, and Studio user profiles
First, let’s clone the demo code from GitHub using your method of choice at: https://github.com/aws-samples/aws-cdk-sagemaker-studio.
As you clone the repo, you can observe that we have a classic AWS CDK project with the following components:
- app.py – The entry point to deploy the AWS CDK stack sagemakerStudioCDK
sagemakerStudioConstructs – Our AWS CDK constructs using the AWS CloudFormation resources from sagemakerStudioCloudformationStack
sagemaker-domain-template and sagemaker-user-template – The CloudFormation templates for the native resources to create the Studio domain and user profile
- sagemakerStudioCDK/sagemaker_studio_stack.py – The AWS CDK stack that calls our constructs to create first the Studio domain and add the user profile
AWS CDK constructs
When we open sagemakerStudioConstructs/init.py, we find two AWS CDK constructs:
- SagemakerStudioDomainConstruct – The construct takes as input the mandatory fields required for the native resource AWS::SageMaker::Domain and outputs the Studio domain ID with the following parameters:
-- sagemaker_domain_name – The name of the newly created Studio domain
-- vpc_id – The ID of the Amazon Virtual Private Cloud (Amazon VPC) that the domain uses for communication
-- subnet_ids – The VPC subnets that the domain uses for communication
-- default_execution_role_user – The IAM execution role for the user by default
- SagemakerStudioUserConstruct – The construct takes as input the mandatory fields required for the native resource AWS::SageMaker::UserProfile, with the following parameters :
-- sagemaker_domain_id – The Studio domain ID
-- user_profile_name – The user profile name
With the cfn_inc function from the module cloudformation_include of aws_cdk, we can include CloudFormation templates in an AWS CDK project.
The constructs use cfn_inc.CfnInclude to call the native AWS CloudFormation resource with the appropriate parameters. See the following code:
my_sagemaker_domain = cfn_inc.CfnInclude(self, construct_id,
                                         template_file=path.join(path.dirname(path.abspath(__file__)),
                                           "sagemakerStudioCloudformationStack/sagemaker-domain-template.yaml"),
                                         parameters={
                                            "auth_mode": "IAM",
                                            "domain_name": sagemaker_domain_name,
                                            "vpc_id": vpc_id,
                                            "subnet_ids": subnet_ids,
                                            "default_execution_role_user": role_sagemaker_studio_users.role_arn,
                                         })


my_sagemaker_studio_user_template = cfn_inc.CfnInclude(self, "UserProfileSagemakerStudio",
                                                       template_file=path.join(
                                                          path.dirname(path.abspath(__file__)),
                                                 "sagemakerStudioCloudformationStack/sagemaker-user-template.yaml"),
                                                       parameters={
                                                          "sagemaker_domain_id": sagemaker_domain_id,
                                                          "user_profile_name": user_profile_name
                                                       },
                                                       preserve_logical_ids=False)
The preserveLogicalIds parameter makes sure the logical IDs of the user profile are renamed using the AWS CDK algorithm, which makes sure they’re unique within your application. Without that parameter passed, instantiating SagemakerStudioUserConstruct twice in the same Stack results in duplicated logical IDs.
For simplicity, we use only the mandatory fields in the constructs, but you can add the fields that the native resource supports to the construct and map them as parameters in your CloudFormation template.
Deploy your AWS CDK stack
To deploy your AWS CDK stack, run the following commands in the location where you cloned the repository:
python3 –m venv .cdk-venv
source .cdk-venv/bin/activate
pip install –r requirements.txt
cdk deploy
Review the resources that AWS CDK creates for you in your AWS account and choose yes to deploy the stack.
Wait for your stack to be deployed by checking the status on the AWS CloudFormation console.
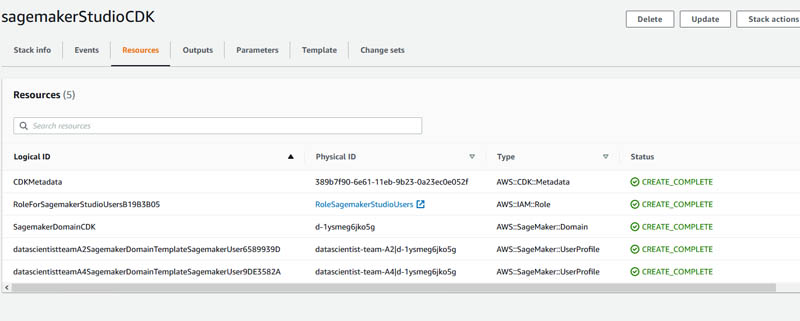
When the stack is complete, on the Amazon SageMaker console, choose Amazon SageMaker Studio. You can see a Studio domain created and the user profile added to your Studio Control Panel.

You can update the domain by deploying the same stack again, because the domain creation was with preserve_logical_ids = True by default.
Clean up:
To avoid ongoing charges for resources you created destroy your AWS CDK stack by running the following commands in the location where you have cloned the repository: cdk destroy
When asked to confirm the deletion of the stack, select yes.
Conclusion
This article showed how you can easily create a Studio domain and add a user profile to the Studio Control Panel using the AWS CDK—without using any custom resources.
References:
https://aws.amazon.com/blogs/machine-learning/automate-amazon-sagemaker-studio-setup-using-aws-cdk/
https://github.com/aws-samples/amazon-sagemaker-model-serving-using-aws-cdk